Monday 31 October 2011

Country Kids - Trick or Treating

We were so excited about Halloween this year.  At three and a half, it was the first year we'd decided to take Ruby out trick or treating.

Last year she absolutely loved it when the kids came knocking, and dutifully held out the basket for them to fill up on chocolates.

However, we've moved to a new area and I really wasn't sure whether trick or treating was de rigueur here or not.  On my trips to and fro to nursery and out and about I hadn't spotted one single house decorated for Halloween, however, the supermarket had completely sold out of trick or treat sweets - so they must do it, right?

We braved the cold, and all dressed up.  What a scary bunch!


We wrestled with our unfeasibly large pumpkin lantern...


We stuck to the quieter back streets and only called on those houses with pumpkin lanterns on the doorstep.  There were some incredibly well decorated houses.

It was a lovely evening, walking in the fresh air and talking about our day.  We looked at the moon and talked about the stars.  Ruby did really well and it was great to see her confidence increasing with each door we knocked on (we were standing right next to her, but even saying 'trick or treat' was hard for her the first few times).

She absolutely loved it - and not just because she got treats!  She loved seeing all the other children dressed up, loved spending time outdoors at night, and loved her extended time with Daddy - she normally goes to bed pretty much as he gets in from work.


I know a lot of people don't approve of trick or treating.  But as long as children are accompanied, not harassing vulnerable people or playing pranks on people, where's the harm...

*waits for everyone to tell me it's begging and celebrating the black arts yadda yadda...*

Country Kids from Coombe Mill Farm Holidays Cornwall

Tiny Who? Tiny Me!


A few weeks back I was invited by Blog Match to a presentation by Australian company Tiny Me, producers of designer personalised kids products.

Spend the evening in a swanky hotel; night off from being a mum; get to meet lots of other lovely bloggers - yes please!

We were treated to a lovely talk and overview of the company by Mike and Ben.  I really warmed to these guys straight away.  Their passion and enthusiasm for their products and business was infectious, and I loved the way their children and families were integral to everything they do.  How many British businessmen do you know who would include snaps of their kids in a business presentation?  It's a shame, but I guess we're just too uptight here!


The business has been running sucessfully in Australia for the past 5 years, and in July 2011 they launched in the UK.  Selling cool personalised kids products,  their eye for design is clear.


Tiny Me takes immense pride in their designs, and the attention to detail shows - bags are lined with their distinctive ticking stripe and even the zipper pull is branded.


They go the extra mile in their manufacturing process too.  For example, their sticky name labels are scratch resistant  dishwasher-proof, freezer-proof  and microwave-proof.

The website is a joy to use, and it's simple to design your own individual order.  There's a huge array of personalised items to choose from - iron clothes labels, height charts, books and stationery; bags and wall art.

To get a flavour of their cool designs, why not sign up for the newsletter and get immediate access to their free downloadables.


I reckon you'll be hooked!

Sponsored post: Many thanks to Blog Match and Tiny Me for hosting the presentation evening.  All views expressed here are my own.

Magpie Monday - The Halloween Edition!

Happy Halloween spooksters!

Welcome to Magpie Monday. For those of you who've not visited before (where have you been?) just a quick reminder of what this is all about.

Magpie Monday is your chance to share your second-hand finds. I set it up as a way of showing that we don't have to buy in to the consumerism taking over the world, and that it's perfectly possible to stylishly clothe yourself; dress your home; feed your literary appetite and entertain your kids with items that have been pre-loved. Championing the Three Rs philosophy - Reduce; Recycle and Reuse.

If you've been reading my blog, it will come as no surprise that I love Halloween!  However, I don't love the throwaway tatty decorations you buy in the shops and supermarkets.  So, as well as making my own, I've also been on the hunt in my favourite charity shops and car boot sales.

I found this gorgeous little orange enamel teapot.  After retrieving it from Ruby's playhouse - she's commandeered it - I attempted a little seasonal flower arrangement with bits and bobs from the garden - Jane Packer I aint!


In the same charity shop, I found this little applique decorative cushion.  I'm not sure if it's handmade, but it certainly has that feel about it.


I'm very happy with these two little items, as I can re-use them year after year, and they cost me the princely sum of £2.50 in total.

If you've bought anything second-hand recently that you'd like to show off, please grab the badge and link up.

Me and My Shadow
Grab my button
and link to my blog


Me and My Shadow

Friday 28 October 2011

Christmas Crafts! Tree Table Place Markers

This is a really simple craft to do with young children, but equally, you could do slightly more refined 'grown up' trees for a more sophisticated table decoration!


You will need:

Thin card (you can use cereal boxes etc as you will only see one side)
Glue
Glitter
Gold/Silver Card (optional)

Cut out your template to make the cones - this is effectively a semi-circle, but if you wish you can use this template.


You will also need to cut out a star shape - this is the name marker so make sure it's big enough to write on!  I thought it looked better in foil effect card as you will see both the front and rear.


Curve your semi circle into a cone and glue in place.  You could use double-sided sticky tape concealed inside, or masking tape on the exterior, but it won't look as neat.


Cover your cone in glue.


Liberally sprinkle with glitter.  We made green trees, but you could colour co-ordinate them to your room or decorations if that's your thing!


I came up with this ingenious stand to hold them whilst the trees dried - a pencil stuck in some blu-tak or modelling clay!


Once fully dried, write your names on the stars, cut out a little nick in the star so it will slot on top of the cone tree.


We thought these would be nice with a little treat hidden underneath on the dinner table instead of a cracker.


Halloween Spooky Spider Sweetcorn Fritters


This was one of those happy accidents!

While I was knocking up a batch of sweetcorn fritters for lunch today, I used the griddle pan instead of the frying pan and noticed how the batter ran into the grooves.


The purists amongst us will note that they don't have eight legs, but who cares! If it bothers you that much you can pour the batter on more carefully to make the correct number for an arachnid.

This is a great recipe to make with your kids.  Ruby loves to help weigh out the ingredients, crack the eggs and whisk the batter.


  • 100g self-raising Flour
  • 150ml semi-skimmed milk
  • 2 eggs
  • Small tin of sweetcorn (or large handful of thawed, frozen sweetcorn)
  • 2 spring onions very finely chopped
  • 4 tsp sunflower oil, for frying or squirts of low-cal Fry oil
  • Black olives for decoration
  • Small pinch salt


    Whisk together the milk, flour, eggs and salt until there are no lumps.  Add the finely chopped spring onion and sweetcorn and stir together.  Ideally leave to stand for 30 mins.
      Oil your grooved griddle pan, and pour a small amount of batter onto the hot griddle.  Cook in small batches of 3 or 4 at a time, cooking for about 3-4 minutes each side, until brown.
        Decorate your spiders with olives for eyes. Great for a spooky supper, snack or brunch.


            Happy Halloween!

            Linking up with:

            Sciencesparks3

            ShowOff Showcase

            Thursday 27 October 2011

            Exclusive Nick Jr Halloween Competition

            I had a little idea which I thought would be fun for all you creative mums and dads out there with little Nick Jr fans.

            We're asking you to get carving on your pumpkins this Halloween and come up with your best Nick Jr themed effort.

            Ruby was very keen for a Peppa Pig Pumpkin, and she was pretty pleased with my attempt - although she has now requested that we paint it pink!


            We'd love you to share or send in your pumpkin creations of your favourite Nick Jr characters.  Maybe you'll pick Dora; Olive the Ostrich; Ben and Holly or Fifi - it's entirely up to you.

            You can use whatever method you like to decorate your pumpkin: carving; painting; sticking or anything else you come up with!

            The winning entry will get a fantastic Nick Jr Goody bag, crammed full of exciting things for your Nick Jr fan.  In addition, the winner will also get a totally unique, money-can't-buy exclusive message video from The Bopps.  We'll liaise with the winner to discuss who you want the personalised message for, so enter for your kids, your grandchildren, your nieces and nephews or maybe for the whole nursery!  The Bopps have kindly agreed to record a special message for the winner - maybe you have a birthday coming up, or you'd like them to make a special Christmas recording just for you.


            How to enter:

            Take a photo of your Nick Jr pumpkin and share the link here in the comments section - a twitpic url or Flickr url for example.  Alternatively, you can email me the picture to missielizzieandmyshadow@ymail.com with the title Nick Jr Pumpkin Competition.  Include your name and contact details.

            For a second, bonus entry, please follow Keith Bopp on Twitter and tweet the following: "I'm entering @missielizzieb's blog comp to win a Nick Jr Goody Bag & special @KeithBopp recording here: http://bit.ly/ss4RaD #NickJrPumpkin".  Leave a separate comment below to say you have done this.

            Terms:

            The competition closes at 5pm on Tuesday 01 November 2011.  Entries received after that time will not be counted.  The entries will be judged by The Bopps themselves, and they will choose the final winner.  The winner must provide an email address after being notified so we can discuss your personal requirements and send the final video file electronically.

            The competition is open worldwide.

            By submitting your photos, you give permission for your images to be used by myself.

            ShowOff Showcase

            Wednesday 26 October 2011

            Attack of the Veg Monster!!!

            The lovely people at Innocent sent us a rather spooky looking parcel yesterday.

            Once I unwrapped the black ribbon and peaked inside the orange box, we were confronted with our ghoulish task...to make a hideous monster from innocent fruit and vegetables!


            We spent a little time going through the contents and I'm happy to report that Ruby knew them all (she won't EAT them all, but that's another story).  Then she decided what would make the best body parts.  The comedy potato for example, was ear-marked as a warty nose, and the brussels sprouts were clearly ghastly green eyes.


            Ruby took delight in stabbing the various components with toothpicks to attach limbs.  She had the inspired idea of using raisins for pupils and a slice of apple for the mouth, and so was born Mrs Bat - because of her pet bat obviously.


            After a little coaxing, Ruby agreed that it would be a waste not to eat her, so after a few more poses for the camera, Mrs Bat met the casserole pot.


            At dinner tonight, Daddy asked about our day.  Ruby gleefully told him we made a vegetable monster then cut  it up and cooked it.  "Oh wow, can I see it" he asked.  "Err we're EATING it!"


            You can join in the spooky vegetable fun with Innocent too, and upload a photo to win prizes!  The first 1,000 entries will win a limited edition set of spooky glow in the dark number magnets. Use your letter magnets (which you've all been collecting free with your smoothies yes?) to come up with a name for your fruity freak.

            Here's what you need to do:


            1) Make your fruity freak or vegetable monster from the spookiest looking fruit or veg you can find.

            2) Give it a name and use your innocent magnets to spell it out (how about 'Terry Able' or 'Aaaaaaaaaalan')

            3) Take a picture of your spooky creation and post it in our scary Halloween gallery www.innocentdrinks.co.uk/fruityfreaks and email myfruitandvegmonster@innocentdrinks.co.uk with your flickr name and a postal address.

            4) The first 1,000 entries win a set of limited edition glow-in-the-dark Halloween 0-9 number magnets (the perfect addition to our alphabet set)

            5) When you're done with your monster why not use any leftover veg to make a soup or whizz any fruit up into a smoothie?

            Sponsored post: We were sent a vegetable box to participate and spread the word about this promotion.

            Tuesday 25 October 2011

            Fabric Pumpkins

            Oh my Gourd, I'm at it again!

            I promise this is the last how-to-make-halloween-pumpkins-without-using-pumpkins-post!  But I thought these were so cute I had to share!


            Browsing through my new Martha Stewart book, I came across her instructions for making 'Heirloom tomato pincushions'.  They are beautiful, but sorry Martha they do look more like pumpkins than tomatoes to me!  Or maybe I've just become a little obsessed?

            From Martha Stewart's Encyclopedia of  Sewing and Fabric Crafts


            I decided to adapt the instructions slightly, so here's how to do it.

            Use some orange coloured fabric, and cut out a rectangle.  It's completely up to you what size, but cut it so it's twice as long as it is wide. I started with a 12 x 6 inch piece.  I used a rather shocking 90's velour t-shirt that I bought in a charity shop for 50p!


            You could try with cotton, felt or corduroy fabric, but as you only need small pieces try using what scraps you have.  This project is quite forgiving, so don't worry if your cutting isn't exactly straight, or your sewing is wonky.

            Fold the fabric in half to a square shape, keeping the right sides together.  Stitch the ends together.

            See how I've done mine all wonky just to prove a point *cough*

            It's best to use a long needle and a very long piece of thread.  Also, it needs to be strong cotton or thread as it will need to withstand quite a bit of pulling.  Sorry, but your Pound shop cottons won't cut it on this one!

            Keeping your fabric still inside out, and hopefully with the same continuous length of thread, sew a running stitch about 1/4 inch from the top.


            When you have gone all the way around, pull the thread taught and gather the fabric into a pouch.  Do a couple of small backstitches to secure in place then turn the pouch right side out.


            Stuff your pouch with polyester filling (you can buy this from craft shops and haberdashers). Ideally, leave your needle and thread attached so you can continue sewing with the same continous thread.


            Once filled, as before stitch a running stitch around the open end and pull to cinch together.  A couple of small stitches will secure it.  Then, take your needle through the centre of the pumpkin and out through the bottom (this is where it helps to have a long needle!).  Do this a couple of times pulling hard each time to draw the pumpkin shape in.


            Finally, if you still have enough thread left, double it up, and take the needle around the outside top to bottom to make the detailed segmented ridges.  If you don't have enough thread to do this, secure your end, and re-thread double thickness or use thicker embroidery thread.

            Follow the natural lines that the gathering has made and continue all the way around.


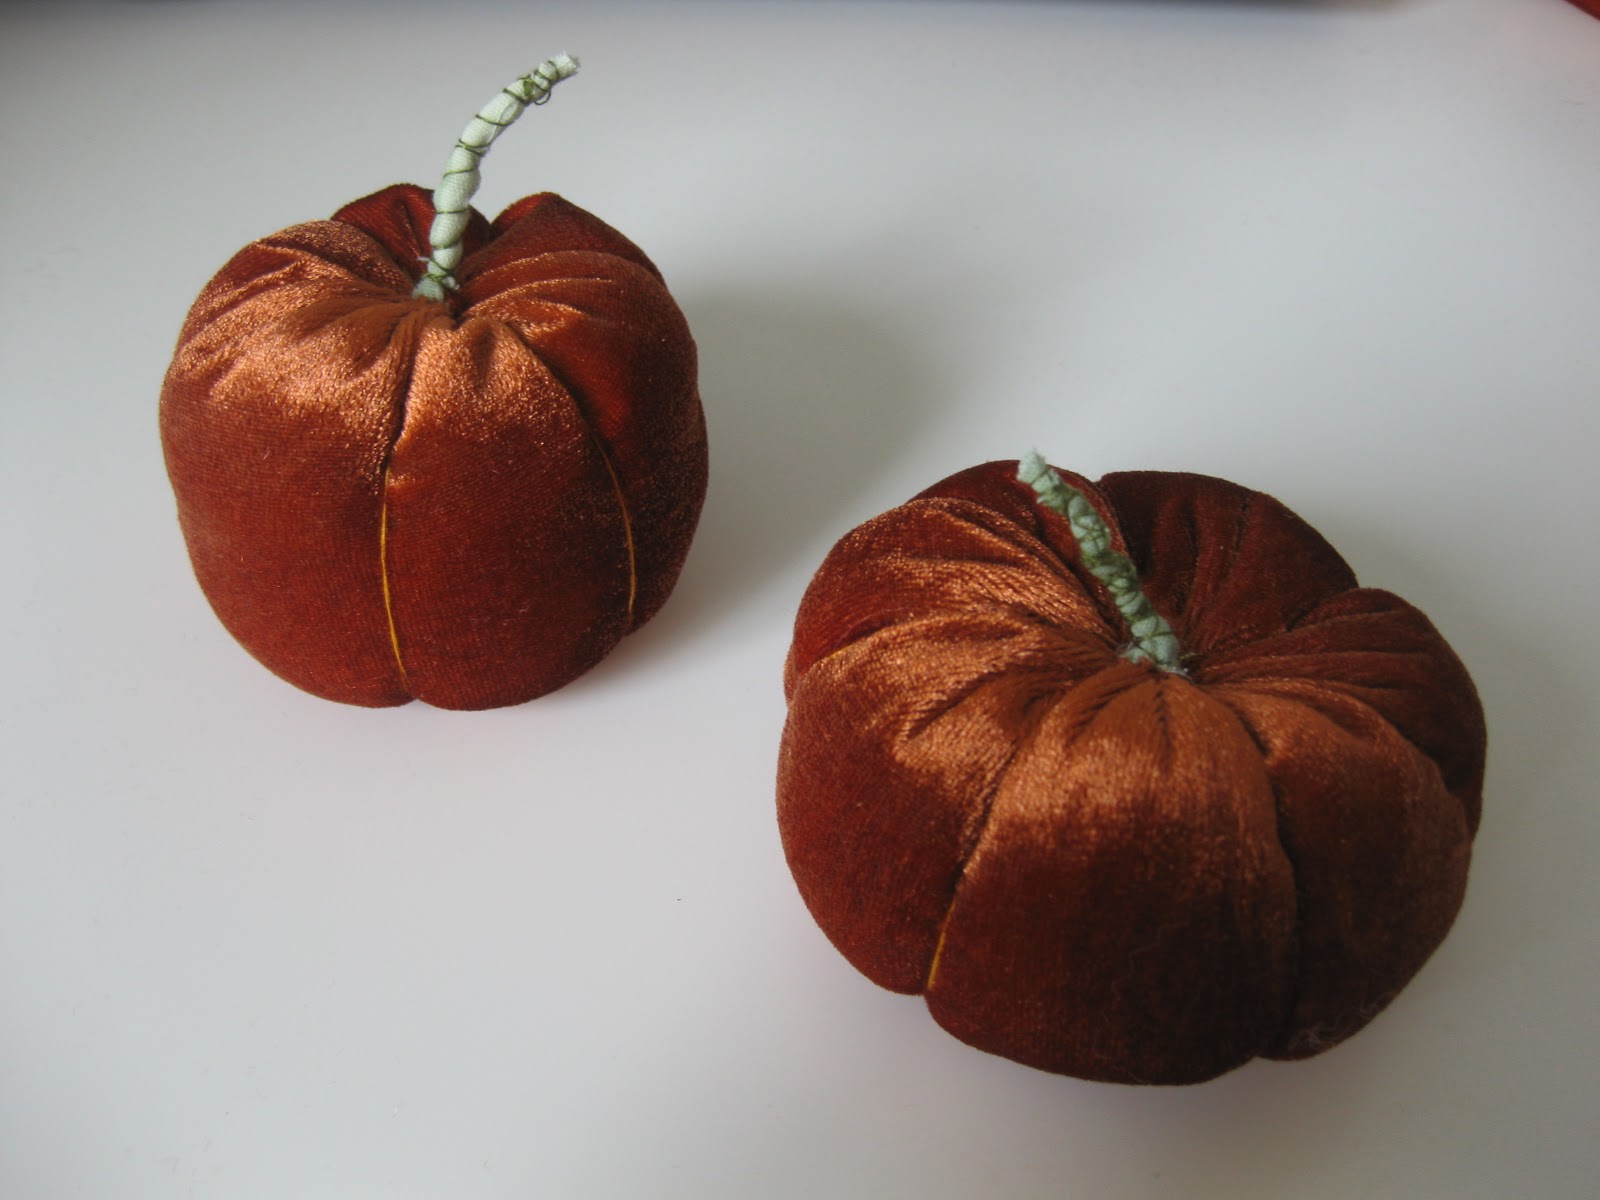
            Your pumpkin will now look like this:


            Finally, make the stem.  You'll need a small rectangular scrap of green coloured fabric.  The size will depend on the size of your pumpkin, but I made my first one approximately 3 x 1 inch.

            Roll up tightly into a long sausage, then secure some green thread at the end with a couple of stitches.


            Wind the thread around the roll of fabric to bind it.  Do this randomly rather than uniformly, then pass the needle and thread through the fabric a couple of times to secure the binding.


            Trim your stalk down to the desired length and stitch it onto the top of your pumpkin.

            Et voila!


            Happy Halloween!

            Check out my other pumpkin and Halloween related posts:

            Paper Pumpkin Lantern

            Pompom Pumpkins

            Fancy Dress

            I also wanted to quickly show you some jam jar lanterns we made, totally inspired by the fabulous Domestic Goddesque and Red Ted Art . Sadly, we'd used all our orange tissue paper up on the giant lampshade lantern, but luckily, ever the hoarder, I'd stashed away these pretty paper wrappers from some Italian Amaretti biscuits I'd scoffed earlier.


            If you can save some of these (ie not do the setting-fire-and-watching-them-float trick), I think they make rather classy lanterns in my recycled jam jars!


            Inspire Me Beautiful


            Thinly Spread

            ShowOff Showcase